HTML Markup
Tip: When you want to edit html tags, click the html button at the top of your page’s editing window
Paragraph
<p>This is a paragraph</p>
Link
<a href=”http://collections.lib.utah.edu”>Marriott Library Digital Collections</a>
Image
<img src=”myimageishere.jpg” alt=”This is alternative text that describes my image, and makes it more accessible”>
Embedding Images through HTML markup
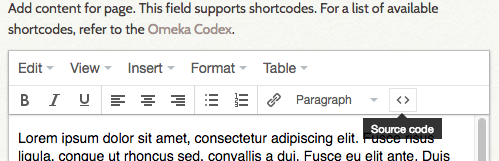
You can get a different type of effect if you want to link to images using HTML markup. Click on the < > Source code button in the editing window for your page in order to try this out.
You need to find the URL for the image location where Omeka is storing your image in order to do this. Here’s the first screen for the item I want to link to:

Click on the thumbnail image for a bigger version.

Click once again until you get to a screen with just the image and a black background. Copy the very long URL at the top of the screen.

When you go back to your simple page, click on the html markup option or source code option < >

Insert the image like this:
<img src=”https://s3.amazonaws.com/omeka-net/40181/archive/files/c51f9f27b3dd92785b3a1f3cd5d2992b.jpg?AWSAccessKeyId=AKIAI3ATG3OSQLO5HGKA&Expires=1537468191&Signature=vN0r8R%2B32bZzZKIcEG7EcNXfaho%3D“ width=”250px” align =”left” hspace=”10″/>
The elements highlighted in bold are pieces of the html markup needed to type in myself to get this effect. This results in an image embedded into the page that is 250 pixels wide, aligned to the left of the page, with a 10 pixel padding around the image.
