Overview
Exhibits are curated digital showcases combining images, text, audio, video, and other uploaded items into coherent narrative for people to browse. They tend to connect to the overarching themes of the site, contextualizing items with complementary narratives.
When building exhibits, it is important to remember that items cannot be created spontaneously in Omeka, but thought must be given to site structure from the outset. You have started to create the items, started to sort them into collections, and finally you will now exhibit them, perhaps pulling from multiple collections for one exhibit.
Creating an Exhibit
1. Navigate to your Omeka dashboard.
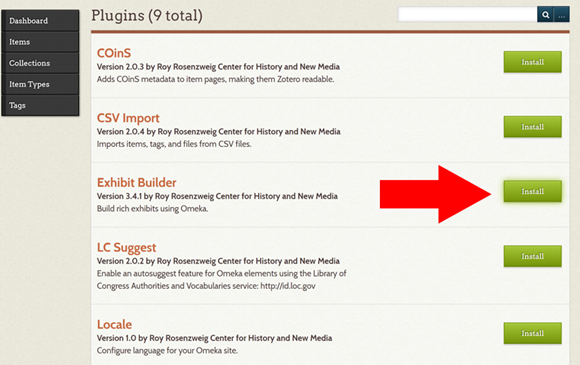
2. Add the Exhibit Builder Plugin
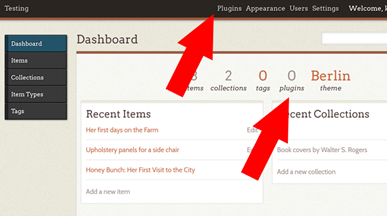
To build an exhibit in Omeka, you must first install the Exhibit Builder Plugin. Access plugins from your dashboard either from the top menu or from the main dashboard menu on the home screen.
3. Install the Exhibit Builder plugin from the list of plugins.
After installing the plugin, you may choose whether users will browse the exhibits by date added, alphabetically by name, or by most recent.
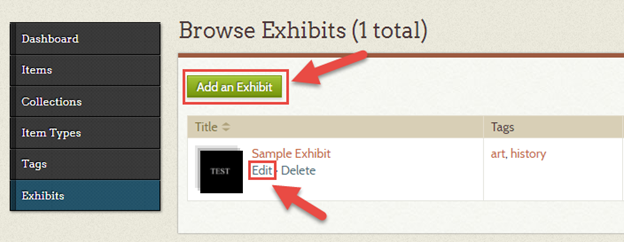
4. Click the “Exhibits” tab in the left-hand navigation bar.

5. Click the add an exhibit button.
6. Fill out the metadata fields to describe your exhibit.
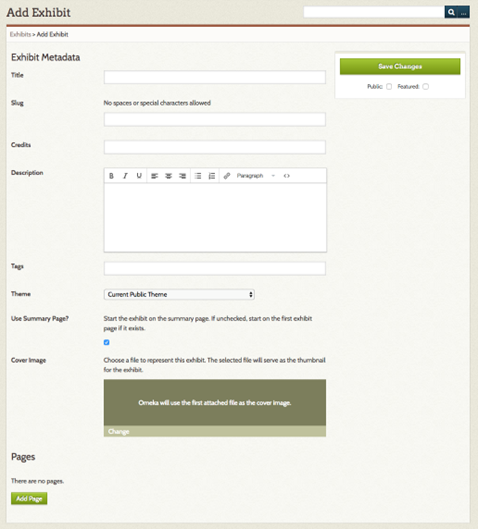
You must create a title and slug (URL)*, and can also fill out credits, description, and tags. You have the option to choose a theme, use a summary page, and choose a cover image.
*The “Slug” is the URL for your exhibit. If you leave it blank, the URL will be all of the words in the title connected with hyphens (example: omeka.net/my-first-exhibit). You can choose a custom URL by filling out the Slug field.
The Description/Summary Page – You have two choices for the first page in your exhibit:
- Fill in the “Description” box on your “Exhibit Metadata” page and use this as the first page in your exhibit by leaving “Use Summary Page?” box checked.
- Uncheck the “Use Summary Page?” box to make the top Exhibit Page the first page in your exhibit
7. Creating a Page
Now that you have created an exhibit, you can highlight your items on pages. Think of the pages as the “walls” of an exhibit.
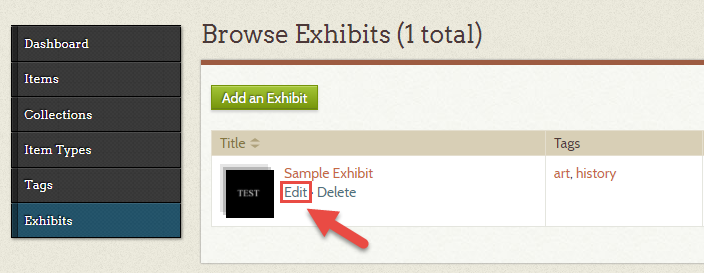
To add a page, go to the “Exhibits” tab on your site’s dashboard and click “Edit” on the exhibit you want to customize.
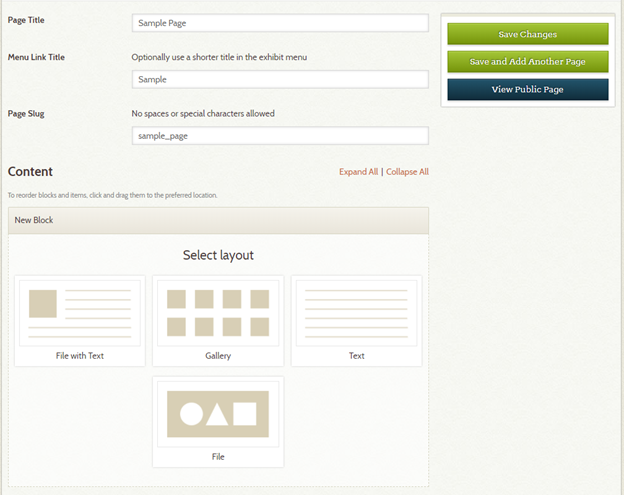
At the bottom of the editing page, click “Add Page”.
Next, you can enter the page’s metadata and choose the layout of your content block. Once you have chosen a layout, click “Add New Content Block” in order to add items and/or text.
A few areas to note on this page:
- The “Page Slug” defines the end of the page’s URL. For example, by entering “sample_page”, the URL for your page would be “http://site_name.omeka.net/sample_exhibit/sample_page”.
- The “Menu Link Title” allows you to name the page link that will be displayed on the front page of the exhibit.
- The “Content” section allows you to customize the layout and upload items to the page. Refer to “Adding Items to a Page” box below for more information on how to utilize this section.
- Once you have completed the page’s metadata and layout, click “Save Changes”.
You can continue to edit the page at any time from the “Exhibits” tab on your site’s dashboard. Click “Edit” on the exhibit that contains the page you want to customize. At the bottom of the exhibit editing page, click on the title of the page to edit it.
8. Adding Items to a Page
To add content to an exhibit, you will first need to choose a block layout. There are initially four block layouts provided with a free Omeka account:
- File with Text – Files are showcased to the left or right of the screen. Text is displayed on the opposite side of the file.
- Gallery – Multiple files can be showcased in a gallery style with an option to add text to the side of gallery.
- Text – Showcases a block of text without any files.
- File – Showcases a single file.
Once a layout is chosen, you can begin to add files. Click “Add Item” to select an item and write a caption. If you have a large selection of items, click on “Show Search Form” to search for the desired item to add.
Once the items and/or text has been added, you can customize the layout of the block by clicking on the drop down arrow next to “Layout Options.”
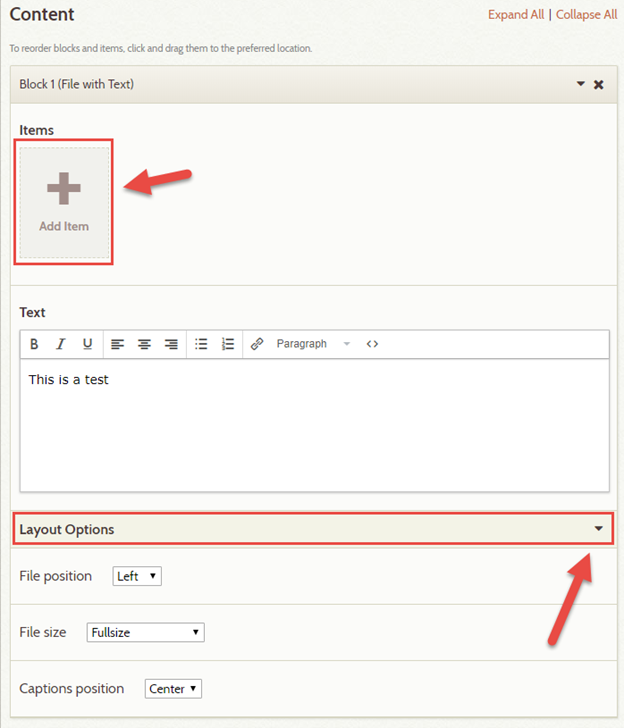
While you are adding blocks and items, you can click and drag individual files or blocks to shift their order.
Once you have added and organized all of the desired content, click “Save Changes” to create the page or save your new additions/edits.
You can continue to edit the page at any time from the “Exhibits” tab on your site’s dashboard. Click “Edit” on the exhibit that contains the page you want to customize. At the bottom of the exhibit editing page, click on the title of the page to edit it.

