Site Editor
The Site editor allows you to design the entire site including the header, footer, and everything in between, with blocks. It gives you greater control over how your site looks.
The Site Editor is only available when you install and activate a Block theme on your site.
How to access the Site editor
To work with the Site editor, you need to use a block theme on your site. A block theme is a theme that uses blocks for all parts of a site, including navigation menus, header, content, and site footer.
All blocks that are available in the WordPress Block editor can be used in the Site editor. A set of blocks called Theme blocks are specifically built for the Site editor.
To find block themes, from the WordPress dashboard, go to Appearance > Themes and click Add New. In the Add Themes page, select Block Themes to find the growing list of Block themes in the WordPress theme directory.

Once you install and activate a Block theme on your site, go to Appearance > Editor (beta) to open the Site Editor.

The Site Editor workspace
The Site editor loads the home page of your site to start editing.
The top menu in the Site editor includes the following options:

- The site icon (or the W icon, if no site icon is set for the site): Return to the dashboard or switch to editing templates or template parts. If you choose to return to the dashboard, it will prompt you to save the changes or leave the Site editor without saving the changes.
- The + Block inserter button: Add a new block, block pattern, or reusable block (if the site has reusable blocks) to the Site editor.

- Tools: Switch between editing a block and selecting a block. Choose the Select tool (or press the
Escapekey on your keyboard) to select individual blocks. Once a block is selected, press theEnterkey on your keyboard to return to editing.

- Undo: Undo the most recent action taken.
- Redo: Redo an action you reversed using the Undo button.
- List View: See a list of all of the blocks that are on the page and easily navigate between the blocks on your page. This is useful for seeing the page’s structure and editing, moving, and removing blocks.
- Templates: The name of the template you are editing.
- Click the down arrow, next to the name of the template to open a drop-down menu.
- Under Areas, you can find all the template parts in the current template.
- Click the three-dot icon next to the template part and click Edit to edit that selected template part.
- You can click Browse all templates to view all your site’s templates.
- You can click Clear customizations to restore the template to the default state (you will lose all the changes you made to that template).
- View: You can view the site homepage in a new tab and see what your site looks like with the changes applied. You can also view the site in a Desktop, Tablet, or Mobile View.

- Save: Save the changes you made in the Site editor.
- When you click the Save button, you will get a list of all the templates and template parts where you have made changes.
- You can choose to save all or just some of them.
- Note that some changes (like changes to the Header and Footer templates) will apply to all pages of your site that use those templates, and not just the page you were working on.
- Settings: Show or hide the Template and Block Settings sidebar menu.
- Styles: Browse style variations available for the theme you have, set the typography, color palettes, and layout for the entire site, or customize the appearance of specific blocks for the whole site.
- More Options: Click the three vertical dots icon to open additional settings and tools.

View: Top toolbar-Display or hide the top toolbar in the editor. When you enable this option, block toolbars are pinned to the top of the WordPress block editor (right under the top toolbar) instead of appearing directly above the block.

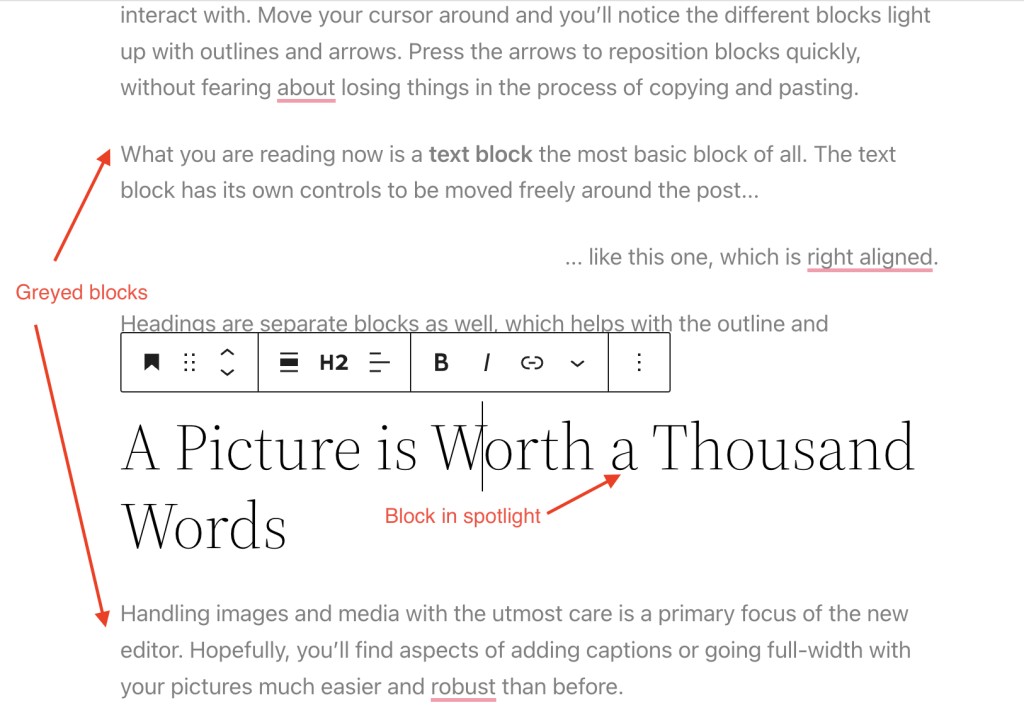
Spotlight mode: All blocks are greyed out except for the one you’re working on so that you can focus on a single block at a time.
Editor: By default, you will be in the Visual editor. Switch to the Code editor to view the entire page in HTML code editor.
Plugins: Here, you can switch between Settings and Styles in the Site editor Sidebar.
Tools: Here, you can download your theme with the updated templates and styles (Export), learn keyboard shortcuts, visit the Site Editor welcome guide, copy all blocks, or view additional support articles.
Preferences: Use the Preferences menu to customize the editing experience and change how you interact with blocks.
How to use the Site Editor
To edit the site’s styles
You can use the Site Editor to customize the styles for the entire website and for the blocks. Styles settings are available regardless of what template or template part you are editing.
- Go to Appearance > Editor (beta).
- Click the Styles icon next to the block settings sidebar.

In the Styles section, you can browse the style variations available for the theme you have, change the color palettes and typography, and layout across the entire site and also change the appearance of blocks which are also applicable across the whole site.
To reset the changes you made, click the three-dot menu icon in the right corner and select Reset to defaults.
To customize the site’s layout
You can use the Site Editor to build the structure and layout of your entire site, using blocks. Eg: areas like headers, footers, and the structural appearance of your site’s posts and pages.
All blocks that are available in the WordPress Block Editor can be used in the Site Editor.
A set of blocks called Theme blocks are specifically built for the Site Editor.
Theme blocks are special editor blocks that play an essential role in full site editing. You can add and style them just like any other block.
However, the unique thing is that they let you dynamically pull in information from your site.
Examples: the Navigation Block lets you customize the site’s navigation menu, the Site Title Block helps to customize the Site Title and more.
Or, let’s say that you want to create the template that all of your blog posts will use. To do that, you’ll get special theme blocks to insert a post’s title, content, author, and so on.
When you add the post title block to your template, it will dynamically insert the actual post title for each post that uses that template.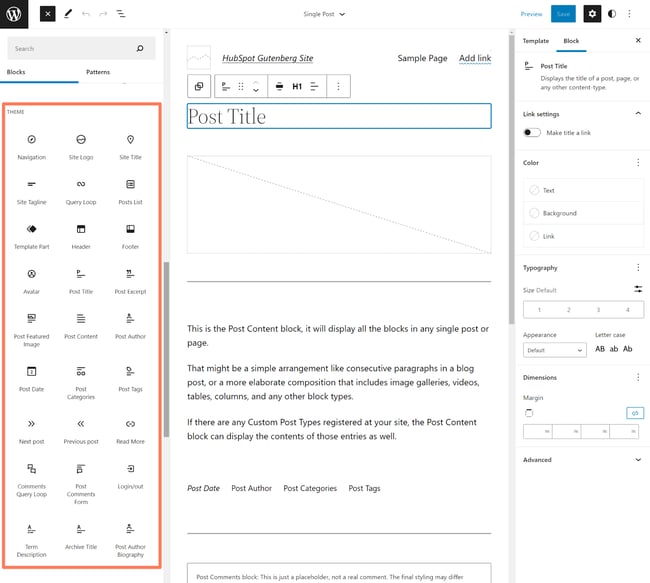
Check out the full list of Theme blocks.
To browse the templates and template parts
From the Site editor, you can easily browse the templates and templates parts available for your site.
- Go to Appearance > Editor (beta) to open the Site editor.
- Click on the WordPress icon (or Site icon if you have set one) to open the Site editor left navigation.
- Click on Templates to view the list of templates available for your site.
- Click on Template Parts to view the list of template parts.
To manage the site’s templates
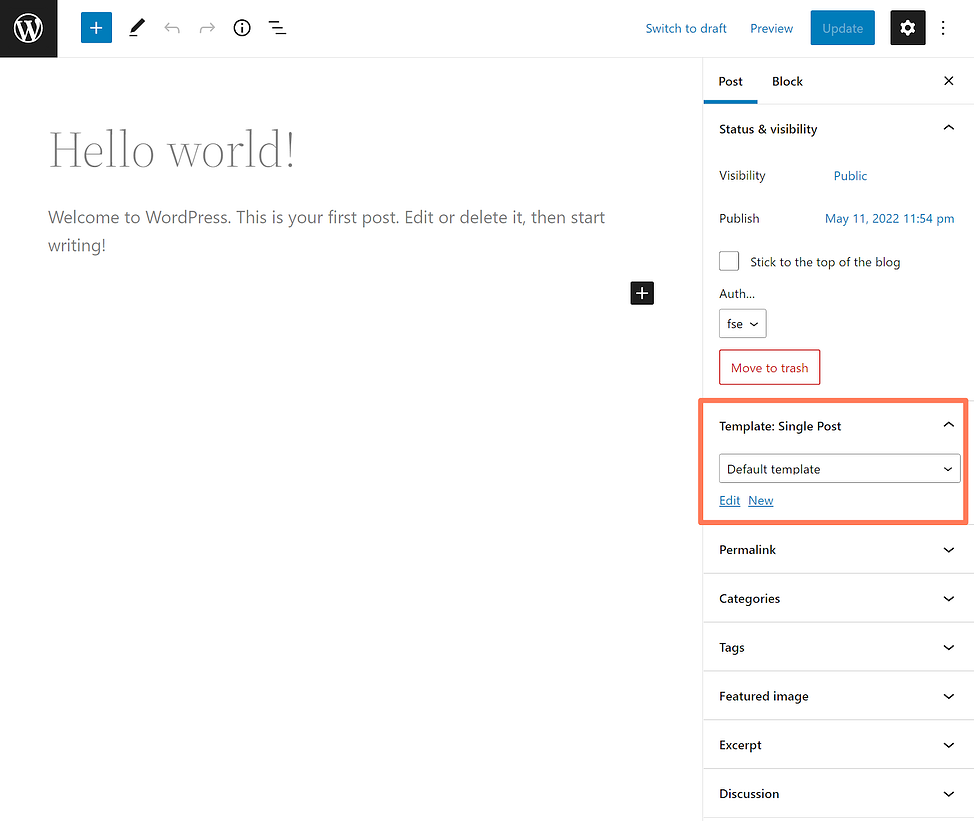
The Template editor is pretty much the same as the Site Editor, but with a slight tweak. It lets you create new post templates that you can assign to individual posts.
You can open it from inside the content editor when you’re creating/editing a post:
From the Appearance > Editor (beta), click the WordPress icon (or Site icon if you have set one) to open the Site Editor left navigation. Click Templates to view the list of templates available including those that came bundled with your block theme and the custom ones you created from the Template Editor.

Once you create the template, you’ll be able to assign it on a post-by-post basis using the drop-down.
To manage the template parts
A template part is what it sounds like – it’s part of an overall template.
The two most common examples of template parts are your header and your footer. You would never have a page that displays just your site’s header. However, your header will always be there as part of the template that also includes the content.
By saving these designs as template parts, you can quickly reuse them in other templates. For example, instead of needing to recreate your header from scratch every time you create a new single template, you can just choose one of your header template parts.
Additionally, if you ever update that header template part in the future, those changes will automatically apply to every single template that uses that template part.
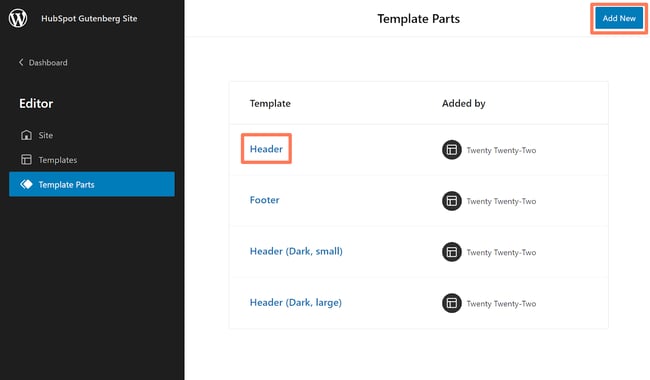
From the Appearance > Editor (beta), click the WordPress icon (or Site icon if you have set one) to open the Site Editor left navigation. Click Template Parts to view the list of template parts created for your theme.

How to Create a Custom WordPress Header With Full Site Editing
Now that you know the basics of how full site editing works, let’s start getting into how to perform specific actions with it, starting with creating a custom header for your site.
But before that, we just want to remind you: if you are not using a block-enabled WordPress theme, you will not be able to follow this tutorial.
Again, you can find block-enabled themes by using the Full Site Editing filter at WordPress.org.
1. Open the header template in the Site Editor.
To begin, open the Site Editor by going to Appearance → Site Editor.
Then, open the Template Parts list. From here, you can either edit the existing header template or create a new one by clicking Add New:
2. Edit header content.
Now, you can set up the design of your header using theme blocks. Here are the blocks that you’ll most likely want to use:
- Site Logo
- Site Title
- Navigation
You can add these blocks just like you would any other block and customize them using the settings in the sidebar:

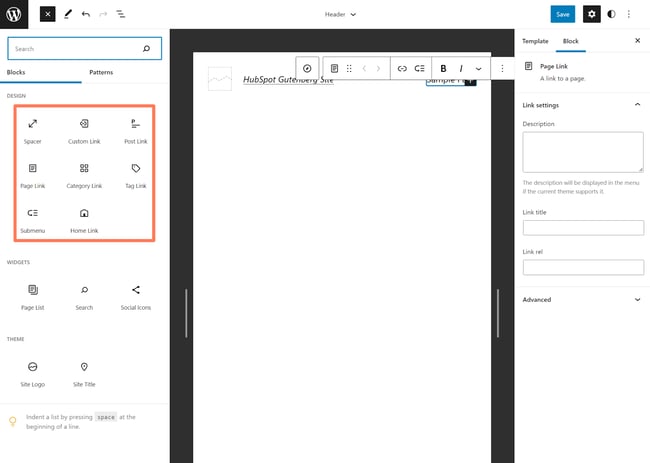
3. Edit your navigation.
The Navigation block deserves special mention because it’s how you’ll set up menus on your site. You can think of it as the replacement for the old menu system that you would access at Appearance → Menus.
Once you select the Navigation block, you can choose Select Menus on the toolbar and then create a new menu.
From there, you’ll get access to another special set of blocks in the block inserter that let you add content to your menu. For example, you can insert links to certain posts or pages that you want to feature in your navigation.
You can also add a submenu to create dropdown menus:
Note – the Navigation block works sort of as a reusable block, which you’ll see in a second.
4. Save your template.
Once you’re happy with the design of your header, you can save your template. When you click Save, you’ll be prompted to choose which changes to update. This could include both the header template and the navigation menu.
How to return to the Dashboard
To go back to your dashboard, click the WordPress icon (or Site icon if you have set one) to open the Site Editor left navigation. Select Dashboard to take you back to your WordPress dashboard. You will be prompted to save the changes you have made in the Site Editor before leaving.
How to export templates and styles
You can export your theme with the changes you made in the Site Editor including the templates, template parts, and style settings, similar to the Tools > Export option.
- Open the Site Editor by going to Appearance > Editor (beta).
- Select the three vertical dots icon next to your Styles settings option.
- Under Tools, select Export. This will begin the export process and you will receive a downloaded zip file of your theme with the templates and template parts included.

Useful tools when using the Site Editor
The following tools are helpful when using the Site Editor.
List View
List View helps you navigate complex block layouts and nested block structures. You can select exactly which block you need, and get a quick overview of the block layout on the page you are working on. You can easily select multiple blocks and edit, move or group them.
Block Patterns
Block Patterns are a collection of predefined blocks that you can insert into posts and pages. You can then customize them further. WordPress comes with a set of standard Block Patterns. You can also find Block Patterns bundled with the block themes.
Using Legacy Theme Customizer in WordPress
If your WordPress theme doesn’t support the full site editor yet, then it will use the legacy theme customizer feature in WordPress.
In that case, you can customize your theme by going to the Appearance » Customize page.

Clicking on it will launch the Theme Customizer.
You’ll see customization settings on the left side of your screen, and the live preview of your website to the right.

The editable areas of your website will be highlighted with a pencil icon on the live preview.
You can also expand each option on the left panel to change its settings.

The number of options in the left panel will vary from one theme to another.
However, most themes will support the basics like your site’s tagline, widgets, homepage settings, menus, and Additional CSS settings.
For more details, view our guide on how to use the WordPress theme customizer to edit your theme.

